By Lynn Bonelli
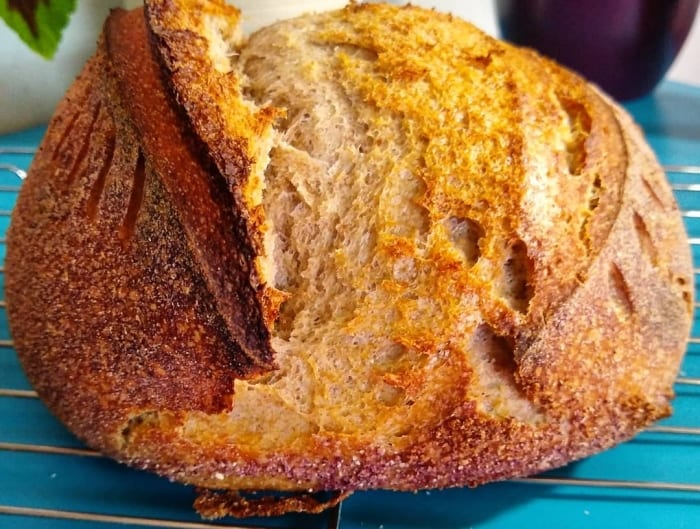
No fail sourdough starter & sourdough bread tutorial different than most. I start off the whole process by creating a fruit water ferment. This water is then mixed with flour to kind of kick start the sourdough starter. For me, this was a game-changer in my own quest for sourdough bread that wasn’t shaped like a giant hockey puck. You know the ones…they taste great but you can’t make a sandwich out of it because it’s as flat as a pancake…and mostly crust. So, I offer you this tutorial in the hopes that it makes your experience positive and gets you on the road to making really good sourdough bread.
A few grievances…I’ve seen a ton of tutorials, listened to podcasts, and read a lot of blogs regarding sourdough. Most will tell you that you HAVE to use reverse osmosis water, or filtered water, or spring water, or some other special water in order to make sourdough. They also say you HAVE to use bread flour or a particular (and expensive) brand of flour that may require ordering online or making yet another trip to the store. I’ve been baking bread for several years now. As a matter of fact, I bake 18-20 loaves for the Farmer’s Market every week and I sell out. All of my sourdough has been made with tap water…shocker, I know. It’s also been made with 100% local flour from our small town’s mill. Yep, my whole wheat and my white, all-purpose flour come from Cortez Milling Co.
Now, that’s not to say that I wouldn’t see differences (good or bad) in taste, texture, or rise if I tried other types of water of flour. But it does mean that you don’t have to wait until the stars align to begin your sourdough journey. Sourdough Starter & Sourdough Bread is not about fancy. JUST START WITH WHAT YOU HAVE!!
Getting Ready
Day One: In a quart-size mason jar (or similar non-metallic container) add 1-2 cut up apples (peels and all) OR some apple peels, banana peel, a few raisins or other dried fruit. Top with water leaving about an inch of headspace and place lid on tightly. Place in a warm spot out of the sun. Warm being 68-80 degrees F.
Day 2-4(ish): Gently shake the jar 2-3 times a day. You may also want to “off-gas” the jar by opening the lid and closing it tight again. We are looking for effervescence, or carbonation, like a soda can being opened. The time it takes for the fruit to ferment will depend on the temperatures in your house. Use your sense of smell to ensure your ferment isn’t “off” …it should smell good and might start to get a boozy odor. This is good.
Day 5(ish): Once your ferment is active (fizzes like a soda being opened) it’s time to make your starter. Drain the fruit from the ferment water bring sure to RETAIN the water! In a non-metallic container mix 50g ferment water and 50g whole wheat flour until completely combined (no wet spots). It’s important to measure by weight and NOT volume. Water weighs more than flour!!! Place the lid securely and put back in your warm spot.
Eight to twelve hours later: Add an additional 50g ferment water and 50g whole wheat flour. Mix well so there are no dry spots. Secure lid and put it in a warm spot.
Eight to twelve hours later: Add 150g ferment water and 150g whole wheat flour. Secure lid and place in a warm spot for 4-8 hours. This will once again depend on the temperature in your house.
Is my starter ready??
After the last big feeding and rest, you will know if your sourdough starter is ready to use based on one of two methods. One, it will have doubled in size and have significant air pockets or bubbles. It will feel light and airy…kind of marshmallow-like. Second, you can try a “float test”. I don’t usually do this but a lot of bakers swear by the float test. Basically, you take a tiny amount of your sourdough starter and see if it will float in a little bowl of water. You have to be very gentle in handling the starter and carefully place it on the surface of the water so as not to deflate it. Otherwise, it will always sink.
Making Your Dough
This is a low hydration recipe that is slightly stiff and perfect for learning the basics. It’s easy to handle and makes a tasty loaf.
140g starter
240g water
400g white flour
9g salt
Start by mixing the starter and water until the starter is dissolved. Add flour and mix to combine so there are no wet spots. Cover and let rest 30 minutes. This is called autolyze.
After 30 minutes add salt and begin stretch and folds. Look at your dough as a compass having a North, South, East and West side. With wet hands, grab a section (North) and stretch it as best as possible then fold it on itself. Turn the bowl and grab the south section stretching and folding. Then do the same with the east and west sides. Cover and let sit in a warm, draft-free spot for roughly 45-60 minutes.
Repeat this process 4 more times. So, every 45-60 minutes you complete the stretch and fold cycle and then cover and let rest. After the last stretch and fold allow your dough to rest in a warm, draft-free spot for 1-3 hours (bulk ferment). Total time will depend on your house temperatures and the strength of your starter. With practice, you will get to know when your dough is ready to shape. It will feel very elastic-like and be smooth. You should be able to pick up a small section and stretch it thin before it tears (windowpane). And an indentation will remain after pushing a finger into the dough (if it bounces back, it’s not ready).
It’s time to shape your loaf. Refer to the video to see how I shape my sourdough bread loaves. It will take practice but the main thing is to be gentle with the dough and to try to create a nice tight “skin”. I do not flour my work surface as the dough will absorb the flour and change the hydration. You can dampen your hands if needed (too damp and the dough will be slippery and you’ll have trouble shaping it).
Let the dough rest about 30 minutes, covered. If you’re baking the same day place your dutch oven or clay baker in the cold over and heat to 480 degrees F. Depending on your oven this will take 1-1.5 hours. You want to ensure the pot you’ll be baking in is as hot as your oven so don’t rush it!
Check your dough and gently reshape if needed. Dust with cornmeal or rice flour and place in a banneton or bowl so it holds its shape…smooth “top” side down. Cover and allow to rest while oven heats.
If you’re baking the following morning, you can place the bowl in your fridge overnight.
Once the oven is at the proper temperature, fold a piece of high heat parchment paper in half (to hold the dough and act as a sling). Carefully remove the very hot Dutch oven. Place the parchment paper over the bowl of dough and invert, gently coaxing the dough out being careful not to deflate it. If needed, use a dedicated brush to remove any extra flour from the dough and then score the top with a razor blade, lame or sharp knife. Using the parchment paper as a sling, carefully lower the dough into the Dutch oven. Spray generously with water to create steam. Place lid on top.
This goes into the oven for 25 minutes. When the timer goes off remove the lid and place back in the oven for 20 additional minutes to complete the bake and to brown the top. Once done remove the bread from the Dutch oven (I use tongs) and allow to cool for at least an hour. The baking process actually continues outside of the oven…cutting your sourdough bread too soon will not give the best results.
Additional tips:
1- If you’re baking the same day, you can pop the shaped loaf in the bowl into the freezer for 30 minutes to make it easier to handle. It can go into the Dutch oven cold.
2- If your bread is getting too brown or burning on the bottom you can place a pizza stone or cookie sheet on the rack below the one you place your Dutch oven on. It will help redirect the heat. You can also try turning the oven temperature down to 450 degrees during the second half of the bake. If you have a brunt section you can use a cheese grater to remove it if necessary.
3- A scale is the number one thing that improved my sourdough bread making. Even a cheap scale will greatly improve your results.
4- I feel that I get better oven spring and nicer looking loaves when I bake the next day. Try it and see for yourself. When doing the next day bake heat the oven and Dutch oven exactly as described. Leave your dough in the fridge until your oven is ready. You’ll be baking the dough directly from the fridge…do not let it come to room temp. Score, spray and bake as described above.
5- If your starter just doesn’t seem to be active try using whole wheat instead of white flour (for your starter only).
6- Practice, practice, practice. The more you practice and keep your starter going the better you’ll understand it. The starter will get stronger and will become a reflection of you and your area picking up yeasts and mixing with the air specific to your location.
I’ve mentioned it before…anyone can give you their favorite starter. You might even find someone to send you starter from Alaska or San Francisco. But eventually, it will adapt to your location, your flour, your air, your water, and your DNA. That makes it unique and why I call my bread McElmo Sourdough, since that’s where my starter lives. Your first loaves might not taste as sour as you’d like but the older your starter the more likely it will pick up the sour flavor. The overnight ferment will help too.
7- Get a thermometer for your oven to ensure its baking at the temperature you want.
8- Experiment! But first, save your starter. I’ve seen it before, someone is excited to bake bread and make sourdough pancakes. Next thing they know, they used all of their starter. Always be sure to save some starter…even if it’s just half a cup. Set it aside so you don’t accidentally use it up. As long as you save a little you can create more easily and quickly. Then you can divide it up and experiment to your heart’s content. Play around with different recipes, different flours, and different hydration levels. But always save a little of your original starter in case things go wrong. Otherwise, you have to start all over again.
9- Don’t panic. When you need a break from baking you can place your starter in the fridge for about 7 days. Then you’ll need to feed it. Eventually, you’ll have a lot of starters so you’ll need to decide if you want to make something out of it (look up sourdough discard recipes) or dump it. If you refuse to get rid of any starter, you’ll soon realize that you need a massive, space-hogging container and a shit ton of flour. You see, the more starter you have the more food it needs. For example, a 102-pound, 5’1″ female doesn’t have the same calorie requirements as a 250-pound, 6’8″ male to maintain their weight and activity level. Right? Likewise, a 1/2 cup of starter doesn’t need to be fed as much as 3 cups of starter to maintain its health.
Signs that your starter is starving…grey liquid settling on top (called hooch) and/or it smells like acetone. Feed it ASAP! Sourdough starter is pretty resilient.
10- Baking after a starter hiatus. After being stored in the fridge, I like to feed my starter 3 times before I bake with it. That might look like this…Tuesday night, take out of fridge, feed it, leave in warm spot. Wednesday a.m., feed it and leave in warm spot. Wednesday p.m., feed it and leave in warm spot. Thursday, make dough, perform stretch and folds, shape and put in fridge. Friday a.m. Bake.
I would like to personally thank Lynn Bonelli for sharing her recipe:
If you get a chance drop by her website @ https://talesfromthemutiny.com/
The Old Man